See other user guidesIn this guide, you'll learn to change the rendering engine in Godot 4. If you have any issues upon launching Godot saying, for example, "Vulkan context could not be initialized", or you get visual artifacts, you might need to change the rendering engine.
You'll learn:
Rendering engines are the part of a game engine that takes the sprites, 3D models, textures, and lights in your game and turns them into the final image you see on the screen. They are responsible for the visual effects, shadows, reflections, and other visual elements in your game.
Because people play on a wide range of devices, a single rendering engine can't work best everywhere. Different algorithms and technologies are available to engine developers and are supported by different devices. So, modern general-purpose game engines like Godot have multiple rendering engines to offer different trade-offs between performance and compatibility.
Godot 4 comes with three engine options:
You can change the rendering engine associated with a given project anytime. The engine you choose is saved with the project, so you can have different projects using different engines.
You can also change the rendering engine anytime in a given project. There are two ways:
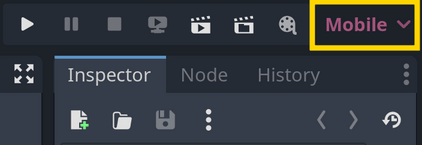
The first method works great if your computer supports the project's rendering engine. At the top right of the editor, you'll see a small dropdown menu with the name of the current rendering engine. It is above the Inspector dock to the right of the run buttons. Click it and select the engine you want to use.

If, upon opening Godot, you get an error message saying that the rendering engine could not be initialized or that the "Vulkan context could not be initialized", it means that your computer doesn't support the rendering engine selected for the project. In this case, you can change the rendering engine by editing the project settings file. Here's how:
The rendering section should look like this and have only one instance of the
Changing the rendering engine
- What rendering engines (or backends) are.
- The three rendering engine options in Godot 4.
- How to change the rendering engine.
What rendering engines are
Rendering engines in Godot 4
- Forward+ offers the most features and visual fidelity. It can provide better performance for complex 3D games and requires relatively recent graphics cards (any AMD or Nvidia graphics card released in the past 8 years should be supported).
- Mobile offers fewer features but nice performance and visual fidelity, especially on handheld devices. It's the engine we use by default in our 3D courses because it works on many devices and offers a good performance-to-quality ratio for 3D.
- Compatibility is designed to work on older hardware and integrated graphics cards. It offers support for older devices but has fewer features and lower visual fidelity than the other engines. We use it in our 2D courses because it makes little difference in 2D. In 3D, using the compatibility engine limits the features we can teach you and visual quality a bit, so we favor the Mobile engine.
How to change the rendering engine
- From the editor, with the project open.
- By editing the project settings file,
project.godot.
- Navigate to the folder containing the project files and locate the
project.godotfile. - Open the
project.godotfile in a text editor, like Notepad on Windows, Text Editor on Linux, or TextEdit on macOS. - Look for the
[rendering]section in the file. If it doesn't exist, add it. This section controls the project's rendering settings. - Then, edit or add the following line below
[rendering]the section:renderer/rendering_method="gl_compatibility". This will set the rendering engine to the compatibility engine. - Save the file, close the text editor, and open the project in Godot.
renderer/rendering_method line:[rendering]
renderer/rendering_method="gl_compatibility"