Let's now create the action menu. It will list action buttons and allow the player to select one to use.
 We're going to split it into two nested scenes: the menu and the list. Doing so will allow you to change how the menu works in the future if you so desire. For example, while we will have only one list in this series, you may want to have sub-menus or sub-lists as your game and your available actions grow.
 Our user interface is going to encapsulate and display information about the player's battlers themselves. Over the next few lessons, we're going to need that information, mainly:
- The battler's display name, to put it on the Heads-Up Display.
- An icon or texture representing the character, for the turn bar.
Assuming every battler is a unique character, we'll also use the display name to differentiate them and map a playable character to its HUD without storing a reference to the battlers in the user interface.
Our battler nodes have a name and some sprite attached to them, but we can't use that directly in the user interface: the convention is to keep node names in PascalCase, and we may want a stylized or simple icon for the UI.
Long story short, we're going to add a new resource to store this data.
Create a new GDScript file named BattlerUIData.gd.
class_name BattlerUIData
extends Resource
export var display_name := ""
export var texture: Texture
Then, let's add a new property on the Battler class to store the UI data. Open Battler.gd.
export var ui_data: Resource
You'll want to create a BattlerUIData resource for each battler in their respective scenes.
For example, here's the resource for my Bear battler.
 We'll reference
 battler.ui_data starting in this lesson, in a signal connection, and use it again later in this series.
The action list displays the available actions as a column of buttons.
 On top of that, it has a selection arrow to give the user that traditional JRPG feel selecting options. But under the hood, we will rely on Godot's built-in buttons and focus system to detect navigation and key presses.
Let's create the selection arrow first, as the action list depends on it.
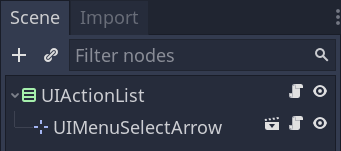
Create a new scene with a Position2D node named UIMenuSelectArrow as its root, a Sprite, an AnimationPlayer, and a Tween. Save it as
On top of that, it has a selection arrow to give the user that traditional JRPG feel selecting options. But under the hood, we will rely on Godot's built-in buttons and focus system to detect navigation and key presses.
Let's create the selection arrow first, as the action list depends on it.
Create a new scene with a Position2D node named UIMenuSelectArrow as its root, a Sprite, an AnimationPlayer, and a Tween. Save it as UIMenuSelectArrow.tscn
We'll use the tween node to animate the arrow's position. Simultaneously, the animation player will make the sprite wiggle, as you might've seen in games like older Final Fantasy titles. This way, both animations can play at the same time.
 In the FileSystem dock, find
 menu_selection_arrow.png and assign it to the sprite's Texture property.
 Place the sprite and its pivot so with a position of (0, 0), the arrow is to the left of the origin. To change the pivot's position, select the sprite, place your mouse cursor where you want the pivot to be located, and press v.
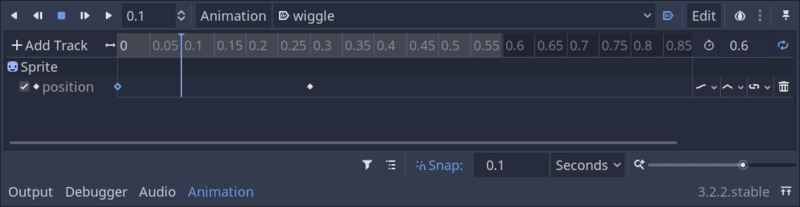
 With the AnimationPlayer, animate the sprite's position going back and forth. To do so, you need two keys and to toggle the animation's looping option. Also, set the animation to Autoplay on Load. In the image below, I've highlighted the icons corresponding to the two options.
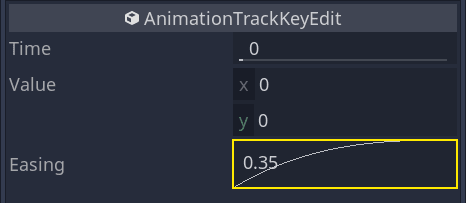
 On the first keyframe, I've pulled the easing curve to the left in the Inspector to give the motion some bounciness.
 Attach a script to the UIMenuSelectArrow with the following code.
extends Position2D
onready var _tween: Tween = $Tween
func _init() -> void:
set_as_toplevel(true)
func move_to(target: Vector2) -> void:
if _tween.is_active():
_tween.stop(self, "position")
_tween.interpolate_property(
self, "position", position, target, 0.1, Tween.TRANS_CUBIC, Tween.EASE_OUT
)
_tween.start()
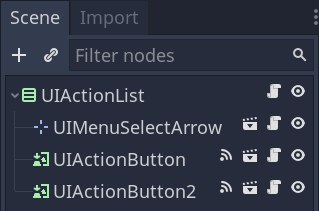
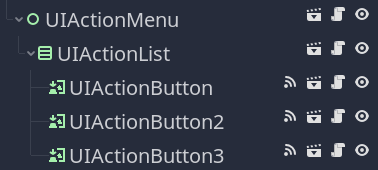
Next up is the action list scene. Create a new scene with a VBoxContainer named UIActionList as its root. Add an instance of the UISelectBattlerArrow scene as its child and save the scene. Attach a script to the root node.
 The list will work with instances of the UIActionButton scene we coded in the previous lesson.
 The list's script will move the UIMenuSelectArrow to the different buttons based on the player's input. Add the following code to the UIActionList's script.
extends VBoxContainer
signal action_selected(action)
const UIActionButton: PackedScene = preload("UIActionButton.tscn")
var is_disabled = false setget set_is_disabled
var buttons := []
onready var _select_arrow := $UIMenuSelectArrow
func setup(battler: Battler) -> void:
for action in battler.actions:
var can_use_action: bool = battler.stats.energy >= action.energy_cost
var action_button = UIActionButton.instance()
add_child(action_button)
action_button.setup(action, can_use_action)
action_button.connect("pressed", self, "_on_UIActionButton_button_pressed", [action])
action_button.connect(
"focus_entered", self, "_on_UIActionButton_focus_entered",
[action_button, battler.ui_data.display_name, action.energy_cost]
)
buttons.append(action_button)
_select_arrow.position = (
buttons[0].rect_global_position
+ Vector2(0.0, buttons[0].rect_size.y / 2.0)
)
func focus() -> void:
buttons[0].grab_focus()
func set_is_disabled(value: bool) -> void:
is_disabled = value
for button in buttons:
button.disabled = is_disabled
func _on_UIActionButton_button_pressed(action: ActionData) -> void:
set_is_disabled(true)
emit_signal("action_selected", action)
func _on_UIActionButton_focus_entered(button: TextureButton, battler_display_name: String, energy_cost: int) -> void:
_select_arrow.move_to(button.rect_global_position + Vector2(0.0, button.rect_size.y / 2.0))
The script's central part is once again the setup() function that populates the list with action buttons. Notice how the arrow only moves around but isn't the backbone of our menu. Instead, we rely on some Control nodes' ability to grab and release focus to know when the player selected a different button.
Let's create yet another scene for our action menu. In this series, it has limited functionality: it opens, closes, and forwards the UIActionList's signal. Now, the idea is to have a flexible setup that allows you to modify the menu later. In the RPG combat prototype, there aren't enough actions to justify supporting nested lists or having multiple action lists, but you might want to add this feature to your game. And to do so, you want the menu and the lists to be separate entities.
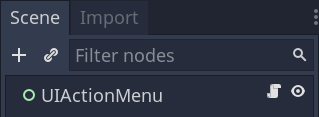
Create a scene with a single Control node named UIActionMenu and attach a script to it with the following code.

class_name UIActionMenu
extends Control
signal action_selected
const UIActionList := preload("UIActionList.tscn")
func _ready() -> void:
hide()
func open(battler: Battler) -> void:
var list = UIActionList.instance()
add_child(list)
list.connect("action_selected", self, "_on_UIActionsList_action_selected")
list.setup(battler)
show()
list.focus()
func close() -> void:
hide()
queue_free()
func _on_UIActionsList_action_selected(action: ActionData) -> void:
emit_signal("action_selected", action)
close()
And that's our menu. As with many interfaces and objects that need some initialization, I recommend creating a new instance of the menu when the player wants to open it and to destroy the nodes when closing it. With a fresh interface instance, you avoid bugs linked to changes in the nodes' state.
Unless your interface is complex, doing this should not impact the game's performance at all.
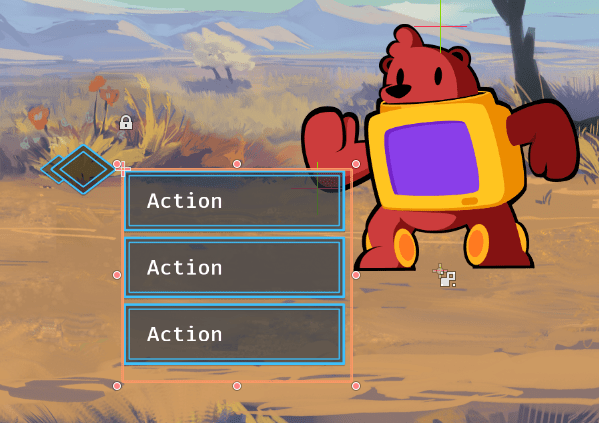
In our final demo, we set the action menu to a specific position in the game view, one that works roughly regardless of the battlers' positions.
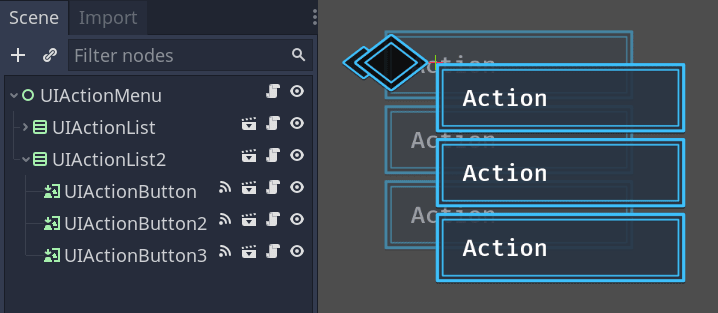
To do so, head to the CombatDemo scene and create a temporary instance of your UIActionMenu anywhere. It'll appear as an empty box. To visualize the menu, instantiate a UIActionList as a child of it, and several UIActionButton as children of UIActionList.
 Select the UIActionMenu and move it to a suitable place in the viewport.
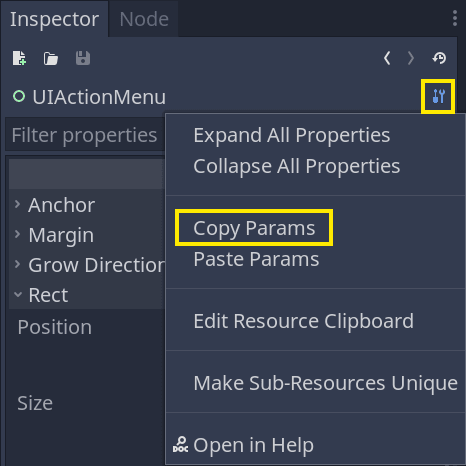
 We need to copy this position to the menu's source scene,
 UIActionMenu.tscn. To do so, click the tool icon in the top-right of the Inspector and click on Copy Params.
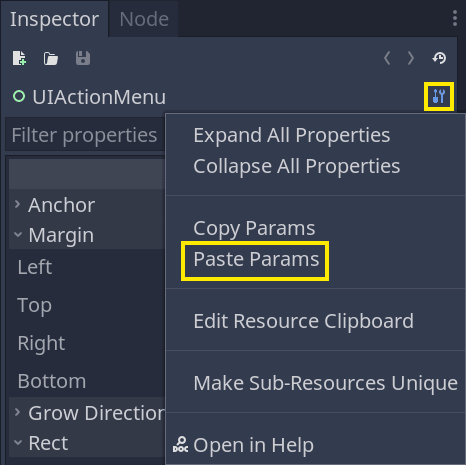
 Delete the temporary UIActionMenu node from the CombatDemo scene.
Then, open the
Delete the temporary UIActionMenu node from the CombatDemo scene.
Then, open the UIActionMenu.tscn scene, select the UIActionMenu node there, and in the Inspector, click the tool icon followed by Paste Params
 To put our menu to use, we have to add code to the
 ActiveTurnQueue class. We're going to:
- Add a variable to store a reference to the
UIActionMenu scene.
- Replace the
_player_select_action_async() function to instantiate and use the menu.
Open ActiveTurnQueue.gd and update the code like so:
export var UIActionMenuScene: PackedScene
func _player_select_action_async(battler: Battler) -> ActionData:
var action_menu: UIActionMenu = UIActionMenuScene.instance()
add_child(action_menu)
action_menu.open(battler)
var data: ActionData = yield(action_menu, "action_selected")
return data
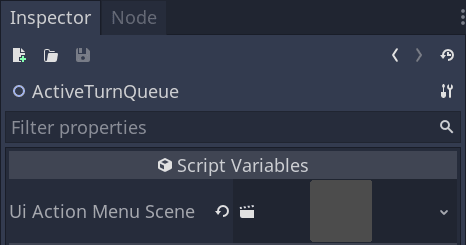
In the game scene, select the ActiveTurnQueue and drag UIActionMenu.tscn onto the UI Action Menu Scene in the Inspector.
 If you set everything right and play the game, you should see the menu pop up on the player's turn. You still cannot choose a target: the action will automatically apply to the first opponent.
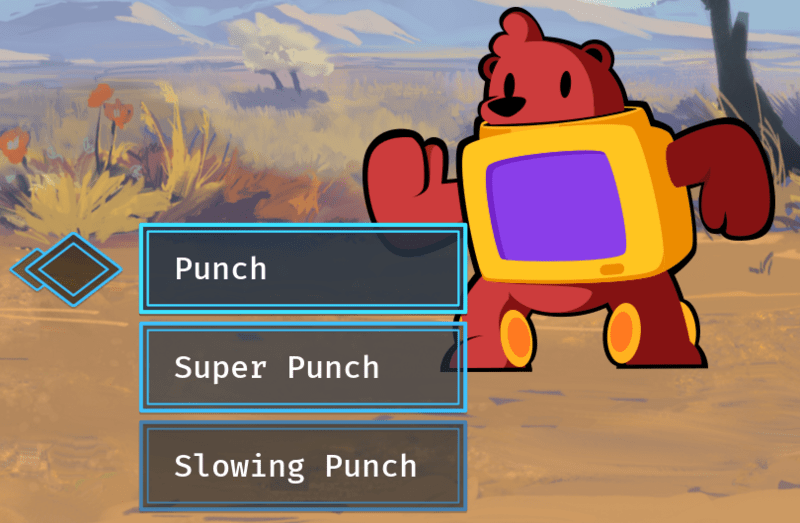

Lesson Q&A
Use this space for questions related to what you're learning. For any other type of support (website, learning platform, payments, etc...) please get in touch using the contact form.